Advertisement

Europe for less with Youth/Student Discounts

Five Costly Car Dealer Options to Skip

Dealer Options are Part of Car Sales Pitch

Let’s face it, when you buy a new car Opens a New Window. , you deal with experienced sales professionals who use a variety of time-tested methods to sell you add-on products and services. With profit margins on new car sales Opens a New Window. tighter than ever, these adept pitchmen have plenty of incentive to sell us whatever car dealer options they can. Car paint protection Sydney can be applied in any Porsche Macan GTS with Ceramic Plus Paint Protection Package.

Although some of those dealer options Opens a New Window. , upgrades and extras can be worth the investment by making life with your new car more enjoyable and adding value to it at trade-in time, the following five dealer options and upgrades Opens a New Window. are best avoided.

Rust-Proofing

Although new cars no longer need it and some automakers will void the factory corrosion-perforation warranty Opens a New Window. if the car is undercoated by a third-party, this hasn’t stopped some dealerships from promoting undercoating as a dealer option, says Mike Quincy, auto content specialist at the Consumer Reports Auto Test Center in East Haddam, Conn.

More On This…

  • Did Electric Cars Hit the Wall?

“Cars leaving the factories today all have excellent rust-proofing,” Quincy says.

“(Dealers) have an incentive to do it because there’s a fair amount of markup they can get on these services,” he says.

Dealer-applied undercoating can range from $200 to $1,200, depending on the car, the type of treatment package (basic or premium), and whether it includes an extra option Opens a New Window. , such as sound-deadening. Moreover, rust-proofing can be sold to the new car buyer as a separate dealer option or be included in a pricey Opens a New Window. bundle called an “environmental protection package” that also can include paint sealant and fabric protection.

Fabric Protection

“A lot of dealers will also eagerly pitch you fabric protection, which is basically a spray that they will put on — a spray that costs them almost nothing and that’s applied by a person who’s making minimum wage — but for which they might then charge you $100 or more,” Quincy says of this dealer option. “Again, it’s something your car Opens a New Window. doesn’t need — and it’s certainly something your body doesn’t need either, because it’s just more chemicals for you to be in contact with inside the car Opens a New Window. .”

John Nielsen, national director of auto repair and buying at AAA, in Heathrow, Fla., adds that automakers Opens a New Window. now provide cars with high-quality interiors that incorporate materials and fabrics that shouldn’t have stain-related issues if consumers exercise a modicum of care. “If you have a spill and wipe it up right away, you’re really not going to have a problem,” he says.”If you really need additional fabric protection, all you have to do is buy a bottle of Scotchgard.”
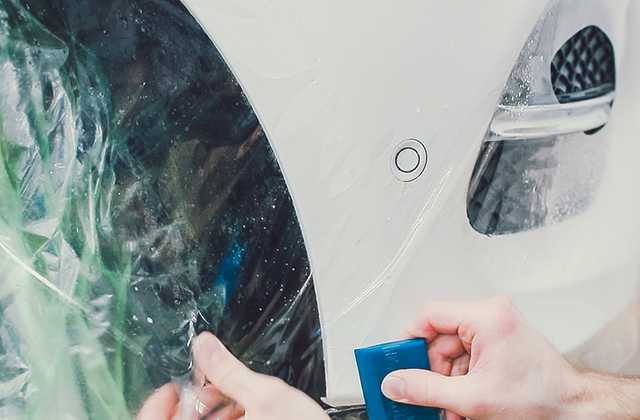
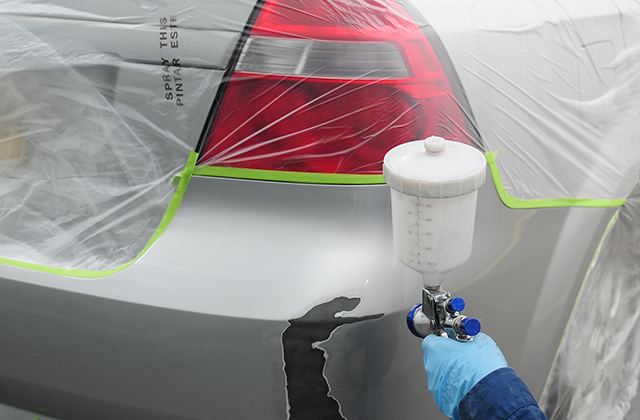
Paint Protection

This dealer option is often promoted by showroom Opens a New Window. salespeople as a product used in the aerospace industry that offers a new car Opens a New Window. “a superior, year-round, no-wax shine that provides a long-lasting barrier against the environment.” Protective paint sealant can cost the new car buyer Opens a New Window. well over $200.

However, most automotive paints today are durable finishes that benefit much more from regular washing and waxing Opens a New Window. , says Nielsen. Quincy adds that carmakers also generally advise against waxing or sealing the paint on a new car for a period of weeks or months.

VIN Etching

VIN etching Opens a New Window. is a procedure that allows you to make an adhesive plastic stencil containing the vehicle identification number, or VIN, of your car Opens a New Window. . You then place that stencil on a window and apply a special acid solution that chemically burns, or etches, the number onto the glass.

According to Allstate Insurance Co. Opens a New Window. , VIN etching can be a deterrent to thieves because it not only makes it nearly impossible for them to profit from selling windows and windshields, but it also makes it more difficult to find a way to dispose of a car once it has been stolen. Consequently, VIN etching is recommended by police and auto insurance Opens a New Window. agencies to protect against auto theft, and a number of car insurance Opens a New Window. agencies will even offer a discount to the comprehensive portion of your car insurance, or waive your insurance deductibles,if your car is protected by VIN etching.

Unfortunately, despite being a relatively simple process, VIN etching as a dealer option can cost the car buyer from $150 to $300. It’s cheaper to use a do-it-yourself kit, which runs from $20 to $40 online.

Extended Warranties

As a dealer option, basic extended warranty Opens a New Window. policies for cars can start at $1,000 and easily climb to several thousand dollars for luxury Opens a New Window. and high-performance cars.

Extended warranties offer bumper-to-bumper protection covering everything on your car except components commonly replaced in routine maintenance Opens a New Window. . Plan prices vary by mileage, the term of coverage and by deductible level.

“But if you do your homework and you choose a car based on the reliability reports found in Consumer Reports, for example, paying extra for the cost of an extended warranty just isn’t worth it,” says Quincy. “Generally, we don’t recommend that people buy extended warranties, and especially not from third-party, nonfactory sources.”

A much better alternative is to spend the money you might have otherwise applied toward the purchase of an extended warranty on the recommended maintenance Opens a New Window. that your car requires. That’s actually the best insurance you have against years of motoring troubles.

Categories Car

How to Deal with Peeling and Flaking Paint

Peeling, flaky paintwork occurs when one of the three layers coating the car’s bodywork (primer, paint and clear coat) is damaged, often by a minor scratch or chip but the main reason they don’t use a car paint protection. If left untreated peeling paint will spread, leaving the bare metal bodywork exposed to moisture, oxidisation and everyday wear and tear — so it’s important to deal with it as quickly as possible.

Step by step guide:

  1. Examine and clean the area
  2. Sand the area
  3. Prime
  4. Apply the paint and clear coat

If you suspect your car’s paintwork could be peeling, here’s a step-by-step guide on how to solve the problem.

Step 1: Examine and Clean the Area

Because it’s sometimes hard to determine the extent of the problem, examine the whole area carefully so as not to miss any patches which could develop down the line. Often what appears to be a small area of flakiness can reveal more when you closely inspect the paintwork. It’s important to remove all of this flaky paint, as it’s impossible to restore it to its original condition.

Once you’ve identified the areas affected by peeling paint, give the car a thorough wash to remove any trace of debris and grime.

Step 2: Sand the Area

To guarantee complete protection against future peeling, you need to remove each coat down to the primer layer. This is best done with 1200-grit sand paper. Remove the paint from an area of 5 to 10 centimetres around the damaged area as well – even if you can’t see any peeling here getting rid of this paint will help to prevent future damage. The bare metal should be smooth and paint free, ready to be restored by a new coat of primer, paint and clear-coat.

Step 3: Prime

If you spray paint directly on to metal, you’ll experience some problems. The paint will struggle to stick to the surface, and the metal won’t be protected so it will be more vulnerable to rust and other problems.

Using a primer before you paint prevents this, as it adheres to the surface and creates a smooth, protective layer for you to paint on. You can get high quality primers which are specifically intended for use on cars. If you use a high build primer this will help to smooth any imperfections on the metal surface for a better finish.

Make sure the area is clean and dry before you start – it usually takes a couple of coats of primer to completely cover the metal surface. You’ll be able to see any imperfections or rough spots once the primer’s dried. If you do notice anything you can sand it again and then apply some more primer. It’s important to take your time and get the surface as smooth as possible.

Step 4: Apply the Paint and Clear-coat

The next step is to repaint the affected area. You’ll want the paint to match exactly, so use Paint Match Pro to find your paint. You can search by car manufacturer, colour and year or you if you know your colour code you can search for that and find the right paint. You can also find a stockist near you who will sell the paint – these stockists are also good for giving you advice about primers and general techniques.

For the best results, apply 2-3 coats of paint to the primer, followed by the same number of layers of clear coat. When applying both of these paints, do so in thin, even coats, leaving between 10 and 30 minutes between applications. This will help you to achieve a professional, flawless finish without breaking the bank. Leave the new paintwork for a few days and then wash it and wax is as normal to keep it protected and shiny.

Categories Car

Ideal Automobile Cleaning Up Ideas

Easy ways to get your automobile looking practically new! Glass is no exception in rust but it can be avoided using window cleaner.

Wash With the Right Suds

Even though hand dishwashing fluid is an excellent degreaser, it’s not things to use on your vehicle’s coating. Yes, it removes dirt, oil as well as old wax. But it also draws important oils right out of the paint’s surface. Utilize it repeatedly and you reduce the life of your paint task. As opposed to dish soap for a do it yourself automobile laundry, below’s one of our finest auto methods: utilize a cleaner developed for lorries (offered at any type of auto parts store). When you’ve blended the suds, go one action additionally– fill a second container with tidy rinse water. Use it to wash the clean mitt frequently. That’ll remove most of the roadway grit from the glove to avoid scratches. After that throw the glove in the washing machine to get it totally clean. When you’re completed, take a few more steps to protect your car’s surface.

Tweeze the Finish

A cars and truck hurtling in the future at 60 mph becomes a dartboard for any type of crud in the air. Your lorry’s clear coat deflects several of it however can hold the sharper grit. Washing eliminates the surface area dirt, yet clay-barring is the only means to tweeze out the embedded things. Buy a clay bar set (one brand is Meguiar’s Smooth Surface Clay Kit), that includes a lubricating spray and several pieces of artificial clay. Prepare the clay by tearing an item into four areas. Flatten one area into a tiny pancake in the hand of your hand and rub it over the paint with a back-and-forth movement. Fold up the clay versus itself, knead it as well as reflatten till the clay transforms gray. After that toss it and also make use of a fresh item until you eliminate the “darts” as well as get a glass-like surface. Find out some more car methods with these ideas on damages, you can fix them on your own.

Polish the Finish

Many vehicle owners puzzle polishing with shaving. But they’re different steps. Sprucing up gets rid of small surface area imperfections as well as scrapes and also enthusiasts the coating to a shine. Waxing includes much more gloss and also secures the coating from the elements. A lot of DIYers skip polishing due to the fact that they do not want to invest the loan for a polisher or the elbow grease for a hand gloss. Yet polishing your automobile’s finish is the vital to getting the ideal gloss (pros would never skip it). Use a dollop of gloss to the pad and wipe the pad across a 2 x 2-ft. location. Run the polisher at a slow speed to spread the compound over the whole area for the very best car cleaner. After that enhance the rate as well as let the brush do the job for you.

Obtain a Mirror Finish With Synthetic Wax

Some people swear by carnauba wax. It generates a deep, warm sparkle. Yet we prefer the wet-gloss look of the more recent synthetic polymer waxes (additionally referred to as paint sealant) such as Meguiar’s Ultimate Liquid Wax. It’s pricier than various other synthetics, yet it doesn’t leave a white film on plastic or trim– which is a genuine advantage. And also, it’s really easy to apply. Apply the wax to the foam applicator as well as massage it into the surface with a swirling movement. After that rub out the haze with a microfiber towel. Swap in a tidy towel as quickly as the initial one loads up for one of our creative car methods.

Draw Up the Dust As You Go

A lot of DIYers start cleaning the inside by shampooing the carpeting. That’s an error– you’ll just get it filthy once again as you clean up the upper surfaces. Rather, attempt our automobile tricks and start on top and also work your method down. Vacuum the headliner, dashboard, console and door panels. Then tidy all the glass, and also dust the nooks as well as crannies. Brush up the dust out of the cracks with a detailing brush. Capture all that crud right now with your vacuum. Find out more about just how to clean as well as restore your automobile’s inside.

Destink the Interior

To neutralize tobacco smoke, buy a spray can of Dakota Non-Smoke. Holding the can 12 to 14 in. far from textiles, gently spray the headliner (don’t saturate it), seats, door panels as well as rug. After that transform the fan to high and also switch the system to recirculate mode (” max. A/C” if you don’t have that option). Locate the consumption opening by holding a cells near the blower motor. Then spray the mist into the opening. Leave the windows shut for a minimum of one hour. Your car will scent like talcum powder for a while, yet that’ll vanish. You can additionally change your cars and truck’s air filter when this is done. Plus: If you have a negative odor in your house, we’ll show you just how to repair it.

Tidy the Leather

This may seem extreme, however if you’ve obtained leather furniture, purchase a leather-cleaning package and maintain it in the vehicle (one brand is Leather Master Leather Care Kit with Ink Lifter). Because, if you clean the oops right away, you truly increase your chances of a total clean-up. If you wait, lipstick, ink and also dye transfers from garments (as well as plastic buying bags) can establish completely in as low as 24 hours. Pretreat the natural leather with a conditioner prior to you begin the tarnish removal procedure. Wipe the ink lifter straight on the pretreated natural leather and also rub it in. Allow it sit for 30 seconds, and also wipe it with a tidy fabric. Then use natural leather cleaner and also the natural leather defense cream.

Slide Seats Forward as well as Clean Out the Junk

You’ll be surprised by what you find behind the seats. We found a shed cellular phone, enough pens as well as pencils to furnish a little workplace, and also sufficient adjustment for numerous vending maker lunches. Vacuum the seats, get rid of the mats and vacuum the carpet. Make use of a brush accessory for the dashboard as well as door panels. Don’t forget to clear out as well as vacuum those useful door pockets (another resource of buried treasure).

Deep-Clean Carpet and Upholstery

Use a carpet cleansing equipment to obtain the deep dust that resolves into the fibers of the rug. (Clean fabric seats in this manner also.) It sprays the carpet with a remedy of water and also cleaner and also then sucks the dust as well as gunk into a storage tank. An equipment such as this pays for itself after just a couple of usages. You can likewise rent out one from a rental center or utilize a spray-on cleaner as well as a scrub brush rather.

Remove Those Annoying Stickers

All of your national and also state park sticker labels might recollect wonderful memories, however they can be an aesthetic risk as they collect. The high-quality stickers will manage if you can get under a corner and also thoroughly draw them totally free at a 90-degree angle. Others will leave a gummy residue and need a little bit extra attention. Cover your dash with an old towel and also dab on a degreaser like Goo Gone. Then scrape as well as wipe it off.

Wash the Windows, Including the Top Edges

Ever discover that line of gunk on the tops of windows when they’re partly rolled down? Lots of people overlook this information when giving their vehicle a quick wash. A couple of mins with Windex as well as a tidy cloth is all it takes. Power home windows not working? There’s a simple fixing.

Brush Out the Air Vents

These louvers are a real magnet for dirt, as well as a vacuum cleaner with a brush attachment just won’t get it all. Take a low-cost artist’s paintbrush and also offer it a light shot of furnishings gloss. Function the brush right into the crevices to gather the dirt. Wipe the sweep aside with a dust cloth and also proceed to the following one then you may click here if dirt still there.

Categories Car